How to use
Here we illustrate how to use the project’s workflows.
Working with the project
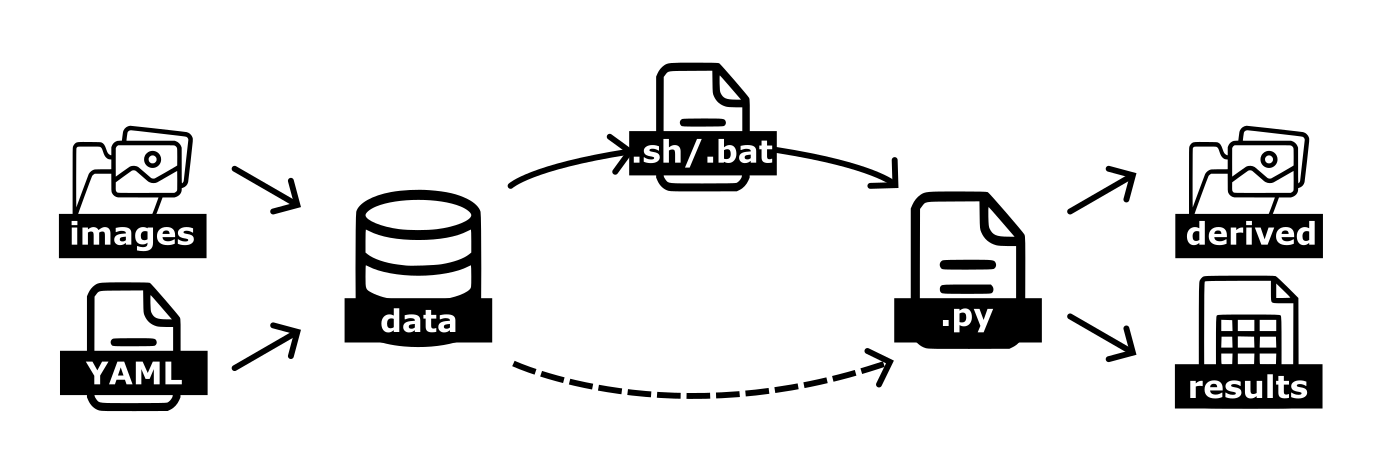
The two main input components are the images (stored in data/) and the configuration YAML file (stored in configs/), which are taken as input together.
You can run the scripts in this repo by:
- using the provided Workflow scripts (.sh) in workflows/ (recommended);
- Visualisations with Jupyter notebooks in noteboooks (advanced);
- Importing as module the Python scripts in scripts (advanced).
There are two sets of parameters:
Running parameters: these are basically the input and output folders location for the raw data, as well as the derived data and results and model names. They are specified either in the workflows scripts (
.shor.bat) or can passed directly to the Python.pyscripts as arguments, see Workflow scripts.Project parameters: these are specific to each dataset, and contain project-specific parameters like image resolution, format, px/mm conversion rates and so on. These parameters are specified in the configuration
YAMLfile, stored inconfigs/, see Configuration.
Workflow scripts
In the workflows/ folder, there are files written in bash (.sh) or batch (.bat) that can be used to run one or more modules in a pipeline. These files are nothing else that a chain of python calls the flow of the processing pipeline.
Hint
If you are running on Linux or Mac OS, run the bash scripts (
.sh), if you are running on Windows, use the batch scripts (.bat)!
To run any of these scripts, in a terminal simply type the name (or path to) the .sh or .bat script and press Enter.
The running parameters (e.g. input and output folders) are declared in these files, and, together with the project parameters in the configuration file, they govern the execution of the Python scripts.
For example:
⚠️ WARNING: this code will not work if copy-pasted in the terminal!
ROOT_DIR="example/path/to/your/root_dir"
MODEL_C="convnext-small-v0"
MODEL_S="mit-b2-v0"

python scripts/segmentation/main_raw_to_clips.py \
    --input_dir=${ROOT_DIR}/data/mzb_example_data/raw_img/ \
    --output_dir=${ROOT_DIR}/data/mzb_example_data/derived/blobs/ \
    --save_full_mask_dir=${ROOT_DIR}/data/mzb_example_data/derived/full_image_masks_test \
    --config_file=${ROOT_DIR}/configs/configuration_flume_datasets.yaml \
    -v
The extract above from workflows/full_pipeline_custom.sh will run the script scripts/segmentation/main_raw_to_clips.py, passing it various global parameters:
ROOT_DIRis the the root directory fo the project; this is important to anchor all the relative path references that modules make;MODEL_Cis the name of the DL model to be used for classification, see list of models Models;MODEL_Sis the name of the DL model to be used for skeletonization, see list of models Models.
Then, the command python is invoked followed by the script to be executed, and the parameters required by that script, in this case:
--input_dirwhere the raw images are stored--output_dirwhere the outputs should be saved--save_full_mask_dirwhere the full images with segmented masks should be saved--config_filethe location of the project configuration file (for more details see Configuration)-vflag for verbose, printing out more details
Not all parameters declared are used in the extract above, however they are necessary for other calls in the same scripts; please also note that different scripts will require different input parameters, whereas the parameters contained in the configuration file are tied to the project and independent from the scripts.
Hint
You can comment out lines of code you don’t want to be executed in the .sh or .bat scripts, so as not to run modules that you don’t need (i.e. you already run them previously on the data or are only interested in specific outputs). In VS Code on your system, you can find the shortcut to comment/uncomment multiple lines by pressing Ctrl + Shift + P (Windows/Linux) / Shift + Command + P (Mac) and typing “Line comment”, and see what keybinds show up.
To run these workflow scripts, in a terminal window with the correct environment activated, simply type the path to the script and run:
workflows/mzb_example_full_pipeline.sh # on Mac / Linux
workflows\mzb_example_full_pipeline.bat # on Windows
Visualisations with Jupyter notebooks
Instead of running the scripts using the workflow illustrated above, users can re-run the Jupyter notebooks provided and visualise the processing steps. Note that in this case the running parameters must be supplied directly within the notebook itself. This is not recommended for “production runs” as it is more prone to crashes, and has significant computational overhead compared to running the workflow scripts as illustrated above.
To re-run a notebook in interactive session, in VS Code simply open it in a Jupyter notebook and select the correct kernel (i.e. python environment) in the top right-corner of the notebook window. Substitute the running parameters with appropriate paths on your local machine and save. The code can then be run block-by-block and will proceed as for workflows above, but will also produce plots, useful when trialling different configuration parameters.
Running Jupyter notebooks requires additional configuration. If using VS Code, simply follow the on-screen instructions that should appear when opening a .ipynb for the first time. You can slo read more about Working with Jupyter notebooks in VS Code.
Please note that the correct conda must be active for running the scripts. The full python environment is provided in environment.yml (see Install libraries locally).
Importing as module
Finally, users can import this repo as a package and make use of its functions in their own scripts.
Make sure the package is installed (see Install libraries locally in case of doubt), and simply use import mzbsuite in your scripts.
Hint
All the python scripts in the repo make use of the __main__ construct and use the argparse module to read in running parameters from command line. You can read more on __main__ functions here.