Project structure
The project contains several directories, but the code is stored in two main places:
The
mzbsuitepackage, containing the main classes and functionalities;The
scriptsandworkflowdirectories making use of its functions.
The mzbsuite folder contains high-level functions that can be imported from other scripts and used to create complex processing pipelines (in Python this is called a package), while the scripts and workflow folders contain files that make use of functions implemented in mzbsuite to run single modules or the processing pipeline as a whole.
Directories and files
Below we describe what the various directories in the project repository are used for.
data/: is meant to contain the raw image data, and by the default the processed images (e.g. image clips, masks, skeletons, etc derived from the raw data) are stored there too, in aderivedsubdirectory; we can also store indatathe taxonomy file (see The taxonomy file).mzbsuite/: contains the functions for each module; these are called in the scripts provided but can also be called from users’ own scripts by importing themzbsuitepackage.scripts/: contains the scripts to run the different modules. Each module has its own folder, and each script is named after the module it implements. These modules can be run in isolation (i.e. each one can be run independently from the others from the command line). See Working with the project, and also Processing scripts for details on the arguments these scripts take.models/: contains the pretrained models used in the different modules. By default, new models are first downloaded from Pytorch model zoo, and the finetuned models are then saved in this folder. A few pre-trained models are provided.notebooks/: contains the Jupyter notebooks used to generate visualisations and run the pipelines; see Visualisations with Jupyter notebooks.configs/: contains the project configuration file,config.yaml, which contains all the parameters for the different modules. This file contains all the settings and hyperparameters for image processing and moel training, and it can be modified by the user to change the behavior of the scripts. The configuration files is always a required input to the scripts.results/: is created by default upon running the scripts or workflows, and is meant to contain the outputs of the different modules. Each module has its own folder, and each script is named after the module it implements.workflows/: contains the workflows bash scripts (.sh), that allow to run one or multiple modules with shared parameters (e.g. on the same dataset). Running parameters are also declared in this bash scripts; refer to Workflow scripts for a more detailed explanation.
The file environment.yml contains all the minimal dependencies for the project, and should install the functions in mzbsuite as well. However, if this does not work, the mzbsuite package can be installed separately using the setup.py file in the mzbsuite folder, via pip (see here)
Modules
This project contains 3 modules:
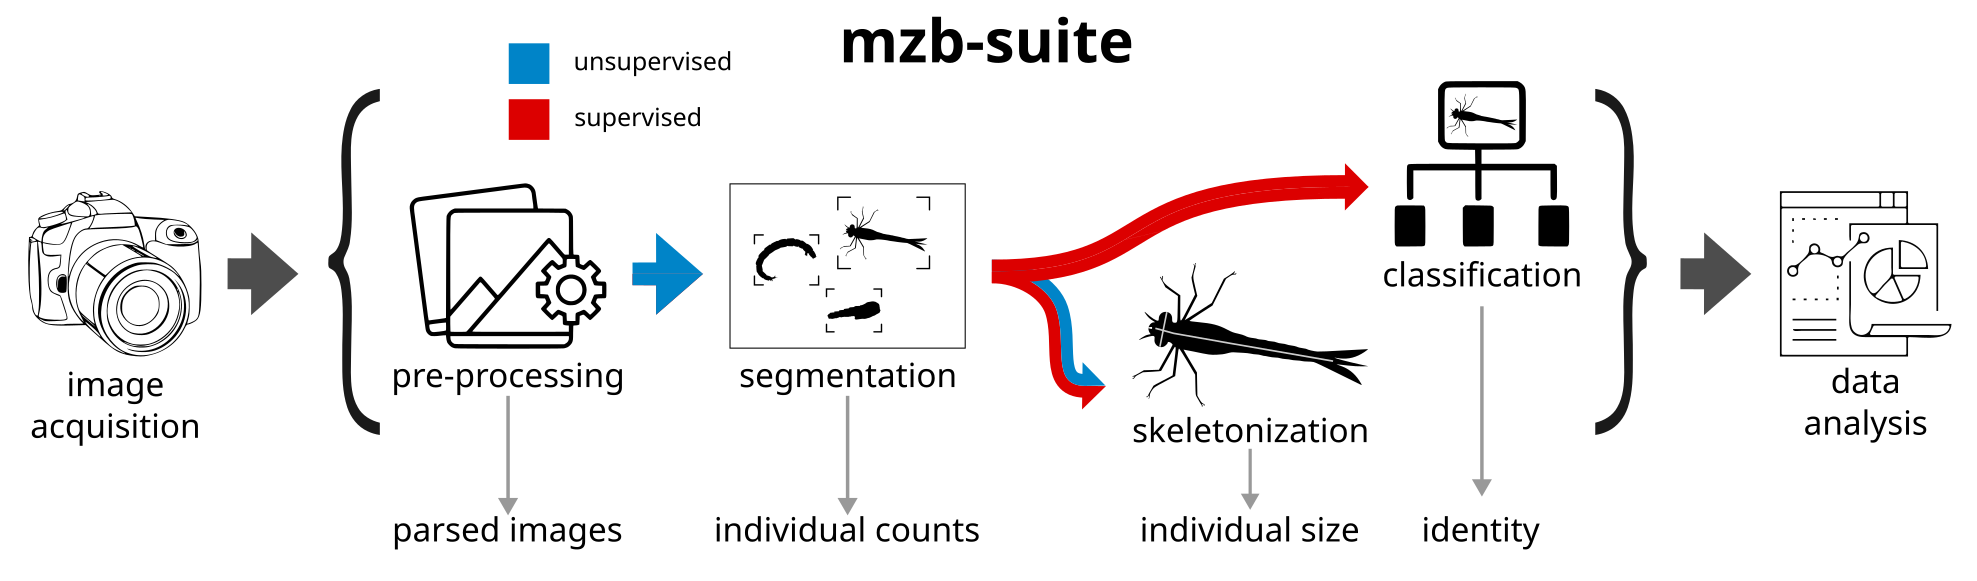
Module Segmentation: this module is mainly used as preprocessing steps for classification and measurements, but contains handy functionalities on its own. The raw input images are wide RGB photographs of many organisms, which are hard to process on their own. A first step is to detect all the organisms as independent and disjoint objects, and to crop them out of the original image. This is done with traditional image processing methods, and it is completely unsupervised. From this, we derive i) an RGB crop of the organism, with filename corresponding to the original image name plus clip ID and ii) a binary mask of the insect, filename corresponding to the original image name plus a clip ID. The binary mask can be used to compute the area of the insect (number of pixels) and RGB + clip can be used to compute local descriptors.
Module files/scripts/processing_scripts:Skeleton Prediction: this module contains the code to measure the length and head width of organisms. The user can chose two approaches: completely unsupervised or supervised. The first, unsupervised approach uses image filtering, mathematical morphology and a graph-traversal algorithm to come up with a measure approximating only the length of the organisms, made from a the mask obtained from the original images; performance is better for organisms that are long and thin, slightly less accurate for complex shapes. The second approach to measure size is based on supervised Deep Learning (DL) models, which are trained based on manual annotations provided by a human expert of organism length (head to tail) and head width; the two predictions of the model correspond to the probability of each pixel to be along the “body” skeleton segments, or along the “head” skeleton segments. Postprocessing thins out those predictions to a line, and the size of the sample is then approximated by the sum of the length of the body and the head, respectively. The scripts in this module also allow users to finetune this DL model on their own data, and to use it for inference on new images.
Module Classification: this module contains the code to train and test a model to classify the organisms in MZB samples, according to a a set of predefined classes. Image classes in our case were encoded in the filename, but this not need be the case, as long as files are stored in a hierarchical directory structure. We also provide a pre-processing script to reclassify class names based on The taxonomy file, that groups classes according to taxonomic hierarchy. The data used to fine tune pretrained DL classifiers is then duplicated according to this hierarchical structure (each class in its own folder) in
data/learning_sets/{project_name}/aggregated_learning_sets/.
Models
Classification models
So far, these Deep Learning (DL) architectures are available for classification:
vgg: VGG 16resnet18: ResNet 18 layersresnet50: ResNet 50 layersdensenet161: DenseNet 161 layersmobilenet: MobileNet V2efficientnet-b2: EfficientNet B2efficientnet-b1: EfficientNet B1vit16: Vision Transformer 16convnext-small: ConvNext Small
The models are pre-trained on ImageNet and can be downloaded from the PyTorch model zoo. We use torchvision.models to load the models, and we pass weights={ModelName}_Weigths.IMAGENET1K_V1 for the pre-trained weights.
Supervised skeletonization models
For the supervised skeletonization module, we implement only one transformer-based architecture in two versions:
mit-b2-v0: MiT B2mit-b2-v1: MiT B2
See the model original paper for more details.
Adding a new model
In mzbsuite/utils.py you can either add a case to the function read_pretrained_model(architecture, n_class) or add a function returning a pytorch model. In general, the layers of these classifiers are all frozen and only the last fully connected layers are trained on the annotated data. This seemed to work in most of our cases, but can be changed in a simple way in the function.